简单学习
搭建脚手架的目的就是快速的搭建项目的基本结构并提供项目规范和约定。目前日常工作中常用的脚手架有 vue-cli、create-react-app、angular-cli 等等,都是通过简单的初始化命令,完成内容的快速构建。
脚手架是我们经常使用的工具,也是团队提效的重要手段。所以系统性的掌握脚手架相关知识,对前端开发者来说是非常重要的,即使很多人今后不一定都会参与到各自部门或者公司的基建工作,但是系统性掌握好这个技能也可以方便我们后期的源码阅读。下面就一起来了解一下吧。
脚手架的简单雏形
脚手架就是在启动的时候询问一些简单的问题,并且通过用户回答的结果去渲染对应的模板文件,基本工作流程如下:
通过命令行交互询问用户问题
根据用户回答的结果生成文件
例如我们在使用 vue-cli 创建一个 vue 项目时的时候
step1:运行创建命令
vue create hello-world
step2:询问用户问题

step3:生成符合用户需求的项目文件
# 忽略部分文件夹
vue-project
├─ index.html
├─ src
│  ├─ App.vue
│  ├─ assets
│  │  └─ logo.png
│  ├─ components
│  │  └─ HelloWorld.vue
│  ├─ main.js
│  └─ router
│     └─ index.js
└─ package.json
参考上面的流程我们可以自己来搭建一个简单的脚手架雏形
本文所用环境均为node v18.6.0
在命令行启动 cli
目标: 实现在命令行执行 kinda-cli 来启动我们的脚手架
新建项目目录 kinda-cli
mkdir kinda-cli
cd kinda-cli
yarn init -y # 生成 package.json 文件
新建程序入口文件 cli.js
touch cli.js # 新建 cli.js 文件
在 package.json 文件中指定入口文件为 cli.js
{
  "name": "my-node-cli",
  "version": "1.0.0",
  "description": "",
  "main": "cli.js",
  "bin": "cli.js",
  "scripts": {
    "test": "echo "Error: no test specified" && exit 1"
  },
  "author": "",
  "license": "ISC"
}
此时项目目录结构:
kinda-cli
├─ cli.js
└─ package.json
打开 cli.js 进行编辑
#! /usr/bin/env node

// #! 符号的名称叫 Shebang,用于指定脚本的解释程序
// Node CLI 应用入口文件必须要有这样的文件头
// 如果是Linux 或者 macOS 系统下还需要修改此文件的读写权限为 755

// 用于检查入口文件是否正常执行
console.log('kinda-cli is working~')
yarn link 链接到全局
yarn link

我们就可以来测试了,在命令行中输入 kinda-cli 执行一下
kinda-cli
这里我们就看到命令行中打印了
kinda-cli is working~
询问用户信息
实现与询问用户信息的功能需要引入 inquirer.js 文档看这里
yarn add inquirer --dev
接着我们在 cli.js 来设置我们的问题
#! /usr/bin/env node

import inquirer from 'inquirer';

inquirer.prompt([
  {
    type: 'input', //type: input, number, confirm, list, checkbox ...
    name: 'name', // key 名
    message: 'Your name', // 提示信息
    default: 'my-node-cli' // 默认值
  }
]).then(answers => {
  // 打印互用输入结果
  console.log(answers)
})
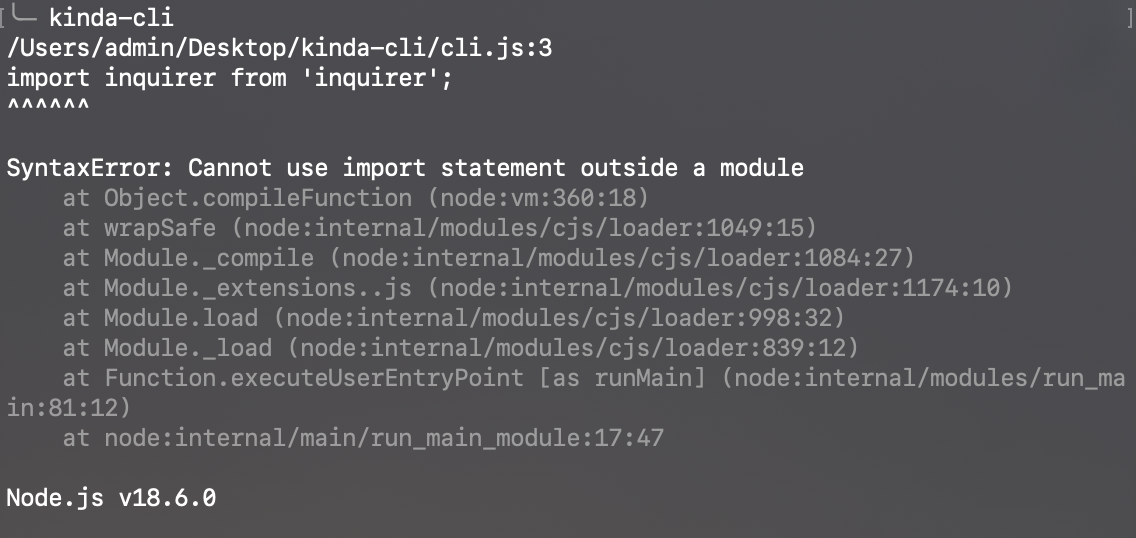
在命令行输入 kinda-cli 看一下执行结果

诶?怎么报错了呢?
因为我们的环境是node v18.6.0,所以此处需要将package.json中的type设置为module。
{
  "name": "kinda-cli",
  "version": "1.0.0",
  "main": "index.js",
  "type": "module",
  "bin": "cli.js",
  "license": "MIT",
  "devDependencies": {
    "inquirer": "^9.1.4"
  }
}
此时再重新执行:

yeah! 成功了。
生成对应的文件
新建模版文件夹
mkdir templates # 创建模版文件夹
新建 index.html 和 common.css 两个简单的示例文件
<!DOCTYPE html>
<html lang="en">
<head>
  <meta charset="UTF-8">
  <meta http-equiv="X-UA-Compatible" content="IE=edge">
  <meta name="viewport" content="width=device-width, initial-scale=1.0">
  <title>
    <!-- ejs 语法 -->
    <%= name %>
  </title>
</head>
<body>
  <h1><%= name %></h1>
</body>

</html>
body {
  margin: 20px auto;
  background-color: azure;
}
此时的目录结构
kinda-cli
├── cli.js
├── node_modules
│   ├── ansi-escapes
│   ├── ansi-regex
│   ├── ansi-styles
│   ├── base64-js
│   ├── ...
│   └── ...
├── package.json
├── templates
│   ├── common.css
│   └── index.html
├── yarn-error.log
└── yarn.lock
接着完善文件生成逻辑
这里借助 ejs 模版引擎将用户输入的数据渲染到模版文件上
yarn add ejs --save
完善 cli.js
#! /usr/bin/env node

import inquirer from 'inquirer';
import path from 'path';
import fs from 'fs';
import ejs from 'ejs';
import { fileURLToPath } from 'url';
const __dirname = fileURLToPath(new URL('.', import.meta.url));

inquirer.prompt([
  {
    type: 'input', //type:input,confirm,list,rawlist,checkbox,password...
    name: 'name', // key 名
    message: 'Your name', // 提示信息
    default: 'kinda-cli' // 默认值
  }
]).then(answers => {
  // 模版文件目录
  const destUrl = path.join(__dirname, 'templates');
  // 生成文件目录
  // process.cwd() 对应控制台所在目录
  const cwdUrl = process.cwd();
  // 从模版目录中读取文件
  fs.readdir(destUrl, (err, files) => {
    if (err) throw err;
    files.forEach((file) => {
      // 使用 ejs 渲染对应的模版文件
      // renderFile(模版文件地址,传入渲染数据)
      ejs.renderFile(path.join(destUrl, file), answers).then(data => {
        // 生成 ejs 处理后的模版文件
        fs.writeFileSync(path.join(cwdUrl, file) , data)
      })
    })
  })
})
同样,在控制台执行一下 kinda-cli ,此时 index.html、common.css 已经成功创建。
我们打印一下当前的目录结构
kinda-cli
├── cli.js
├── common.css
├── index.html
├── node_modules
│   ├── ansi-escapes
│   ├── ansi-regex
│   ├── ansi-styles
│   ├── ...
│   └── ...
├── package.json
├── templates
│   ├── common.css
│   └── index.html
├── yarn-error.log
└── yarn.lock
查看一下生成的index.html文件
<!DOCTYPE html>
<html lang="en">

<head>
  <meta charset="UTF-8">
  <meta http-equiv="X-UA-Compatible" content="IE=edge">
  <meta name="viewport" content="width=device-width, initial-scale=1.0">
  <!-- ejs 语法 -->
  <title>
    test
  </title>
</head>

<body>
  <h1>test</h1>
</body>

</html>
用户输入的 { name: 'test' } 已经添加到了生成的文件中了。